difference between label and textbox
Hello there, In this post on Solsarin we’re mentioning the “difference between label and textbox”
So while Labels and TextBoxes both inherit from System.Windows.Control they are different things, intended for different purposes. In the same way that oranges and apples are both fruit, but are different.
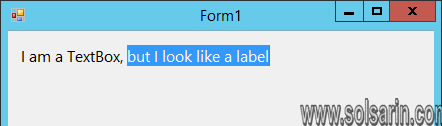
However, if you’re creating an application and want to have something that looks like a label, but allows the user to select (but not edit) the text, then you can use a TextBox with the following properties set:
Backcolor = ControlReadOnly = trueBorderStyle = none
As shown below…
Alternatively, if you have an application and want to get a text from something like a label, you can use the Win32 API function GetWindowText, if you know the handle to the window that contains the text. In a Win32 context, a “window” means just about anything distinct that is on the screen, not just the windows that you can drag around with your mouse. WinForms is an abstraction on top of all this.
What is the difference between the text box layout and the label layout? (P-touch Design&Print)
Text box layout: Text can be aligned on the left or right side or in the center of the text box.
Label layout: Objects can be aligned on the left or right side or in the center of the label.
Do the following procedure for each set:
Text box layout
- Tap the label on the editing screen and then input the text and symbol.
- Tap the [Font] on the text input screen.
- Select the position you want to place and tap the [Left], [Center] or [Right] in the font setting.
Label layout
- Tap the [Label alignment] bottom of the editing screen.
- Select the position you want to place and tap the [Left], [Center] or [Right].
HTML Inputs and Labels: A Love Story
Most inputs have something in common — they are happiest with a companion label! And the happiness doesn’t stop there. Forms with proper inputs and labels are much easier for people to use and that makes people happy too.
In this post, I want to focus on situations where the lack of a semantic label and input combination makes it much harder for all sorts of people to complete forms. Since millions of people’s livelihoods rely on forms, let’s get into the best tips I know for creating a fulfilling and harmonious relationship between an input and a label.
How to pair a label and an input
There are two ways to pair a label and an input. One is by wrapping the input in a label (implicit), and the other is by adding a for attribute to the label and an id to the input (explicit).
Think of an implicit label as hugging an input, and an explicit label as standing next to an input and holding its hand.
<label>
  Name:
  <input type="text" name="name" />
</label>
An explicit label’s for the attribute value must match its input’s id value. For example, if for has a value of name, then id should also have a value of name.
<label for="name">Name: </label>
<input type="text" id="name" name="name" />
Unfortunately, an implicit label is not handled correctly by all assistive technologies, even if for and id attributes are used. Therefore, it is always the best idea to use an explicit label instead of an implicit label.
<!-- IMPLICIT LABEL (not recommended for use) - the label wraps the input. -->
<label>
  Name:
  <input type="text" name="name" />
</label>

<!-- EXPLICIT LABEL (recommended for use) - the label is connected to an input via "for" and "id" -->
<label for="explicit-label-name">Name: </label>
<input type="text" id="explicit-label-name" name="name" />
Not all inputs need labels
An input with a type="submit" or type="button" does not need a label — the value attribute acts as the accessible label text instead. An input type="hidden" is also fine without a label. But all other inputs, including <textarea> and <select> elements are happiest with a label companion.
Read More Posts:
What goes in a label
The content that goes inside of a label should:
- Describe its companion input. A label wants to show everyone that it belongs with its input partner.
- Be visible. A label can be clicked or tapped to focus its input. The extra space it provides to interact with the input is beneficial because it increases the tap or clicks target. We’ll go into that more in just a bit.
- Only contain plain text. Don’t add elements like headings or links. Again, we’ll go into the “why” behind this further on down.
One useful thing you can do with the content in a label is add formatting hints. For example, the label <input type="date" id="date"> will be <label for="date"> as we’d expect. But then we can provide a hint for the user that the data needs to be entered in a specific format, say DD-MM-YYYY, in the form of a <span> between the label and input that specifies that requirement. The hint not only specifies the date format but has a id value that corresponds to an aria-describedby attribute on the input.
<!-- Describes what the input is for - should be plain text only -->
<label for="date">Start date</label>
<!-- Describes additional information, usually about formatting -->
<span id="date-format">(DD-MM-YYYY):</span>
<input type="date" id="date" aria-describedby="date-format" min="2021-03-01" max="2031-01-01" />
This way, we get the benefit of a clear label that describes what the input is for, and a bonus hint to the user that the input needs to be entered in a specific format.
Best practices for a healthy relationship
The following tips go beyond the basics to explain how to make sure a label and input are as happy as can be.
Do: Add a label in the right place
There is a WCAG success criterion that states the visual order of a page should follow the order in which elements appear in the DOM. That’s because:
A user with low vision who uses a screen magnifier in combination with a screen reader may be confused when the reading order appears to skip around on the screen. A keyboard user may have trouble predicting where focus will go next when the source order does not match the visual order.
Think about it. If we have some standard HTML where the label comes before the input:
<label for="orange">Orange</label>
<input type="checkbox" id="orange" name="orange">
That places the label before the input in the DOM. But now let’s say our label and form are inside a flexible container and we use CSS order to reverse things where the input visually comes before the label:
label { order: 2; }
input { order: 1; }
A screen reader user, who is navigating between elements, might expect the input to gain focus before the label because the input comes first visually. But what really happens is the label comes into focus instead. See here for the difference between navigating with a screen reader and a keyboard.
So, we should be mindful of that. It is conventional to place the label on the right-hand side of the input for checkboxes and radio buttons. This can be done by placing the label after the input in the HTML, ensuring the DOM and visual order match.
<form>
  <!-- Checkbox with label on the right -->
  <span>
    <input type="checkbox" id="orange" name="orange">
    <label for="orange">Orange</label>
  </span>
  <!-- Radio button with label on the right -->
  <span>
    <input type="radio" id="banana" name="banana">
    <label for="banana">Banana</label>
  </span>
  <!-- Text input with label on the left -->
  <span>
    <label for="apple">How do you like them apples?</label>
    <input type="text" id="apple" name="apple">
  </span>
</form>
Do: Check inputs with a screen reader
Whether an input is written from scratch or generated with a library, it is a good idea to check your work using a screen reader. This is to make sure that:
- All relevant attributes exist — especially the matching values of the
forandidattributes. - The DOM matches the visual order.
- The label text sounds clear. For example, “dd-mm-yyyy” is read out differently to its uppercase equivalent (DD-MM-YYYY).
Over the last few years, I have used JavaScript libraries, like downshift, to build complex form elements such as autocomplete or comboboxes on top of native HTML ones, like inputs or selects. Most libraries make these complex elements accessible by adding ARIA attributes with JavaScript.
However, the benefits of native HTML elements enhanced using JavaScript are totally lost if JavaScript is broken or disabled, making them inaccessible. So check for this and provide a server-rendered, no-JavaScript alternative as a safe fallback.
Check out these basic form tests to determine how an input and its companion label or legend should be written and announced by different screen readers.
Do: Make the label visible
Connecting a label and an input is important, but just as important is keeping the label visible. Clicking or tapping a visible label focuses its input partner. This is a native HTML behavior that benefits a huge number of people.
That said, there are going to be times when a design calls for a hidden label. So, if a label must be hidden, it is crucial to do it in an accessible way. A common mistake is to use display: none or visibility: hidden to hide a label. These CSS display properties completely hide an element — not only visually but also from screen readers.